


In Navigating Your GA Part 1, our very own Rebecca Berin covered 3 important areas of tracking in Google Analytics that would level up any marketer’s analytics wizardry skills. I’m going to power-level you up further by showing you how to create Google Analytics goals like a pro.
In this post, you’ll learn:
- What goals are from a technical perspective
- The differences between macro and micro strategies.
- And the minute details of goal configurations.
Goals in Google Analytics
If you’ve used Google Analytics, at the very least, you know the “Goals” section exists. Goals in GA are the things that can measure actions happening on a website.
Okay, cool, but what does that really mean, and how does it affect the big picture (i.e. getting a return on any of your primary business goals)?
I’m glad you asked.
Technically speaking, goals represent a completed activity (or a conversion), that’s triggered by specific types of user-interaction. So, when a user visits your site or app and performs an action that’s defined as a goal, Analytics records that as a conversion. Then, it’s leveraged in special-purpose reports.
Goal Strategies
Take some time to think about the different actions you want users to take on your website. Now, classify them into Macro and Micro conversions.
Macro
Think of macro conversions as your primary objectives. These are the actions that drive the most value for you and your organization.
Example: Leads, Purchases, account creations, and Bookings
Micro
These secondary objectives are actions that show a high level of engagement but don’t provide the same value as Macro conversions.
Example: People entering their details to download a PDF, subscribing to email updates, commenting, or logging into a members area.
It’s important to know this distinction and have a good marketing strategy in place so you can craft a complete picture of your website’s success. Having Google Analytics configured to include the right types of (Macro and Micro) goals is important because it gives a business a data-driven approach to assessing the volume and quality of success.
So let’s get after it!
Setting Up Goals Like a Pro
If you’re new to Google Analytics or you’re overwhelmed by the complexity of it all, then this next part is for you.
“All we have to decide is what to do
with the time that is given to us.”
-Gandolf The White, probably
Where to Start
Once logged in to your Google Analytics account, you’ll find that Goals are configured at the view level.
Pro Tip: Make sure your user account has at least edit permissions.
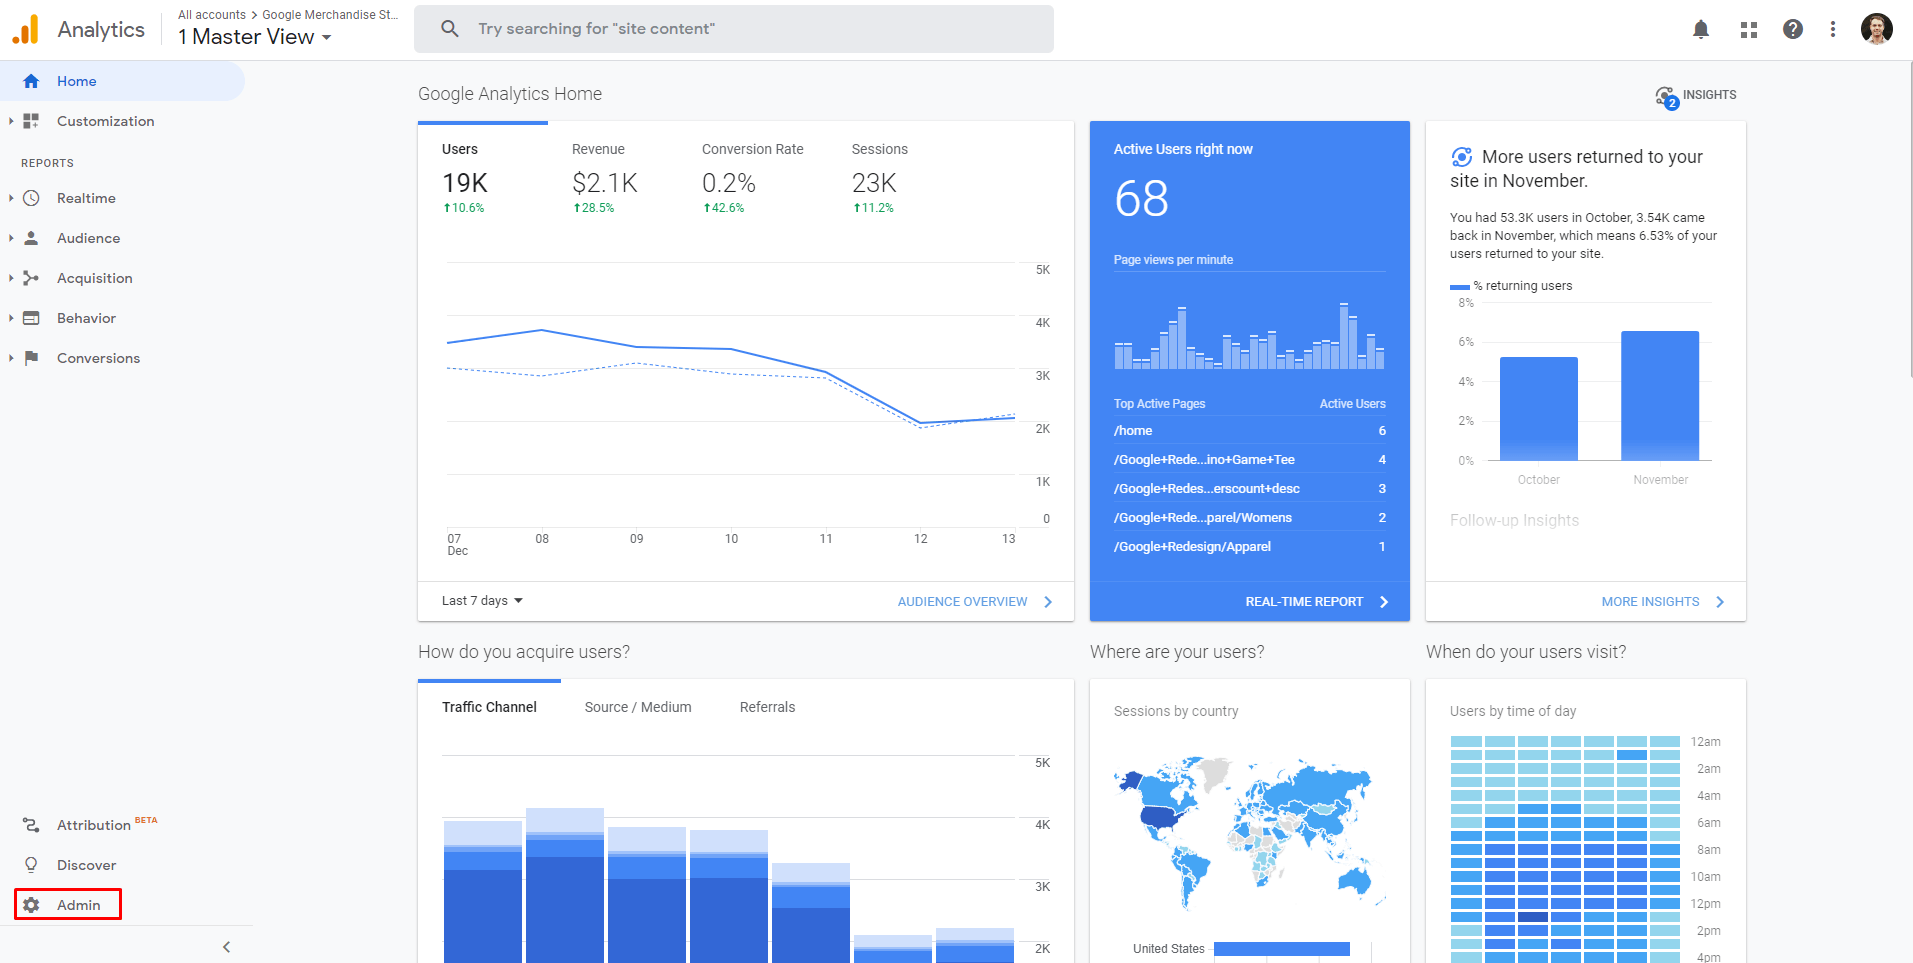
Step 1. Get to tha Choppa… I mean, Admin
In the Google Analytics Home screen, click the Admin icon/button in the lower left-hand corner.
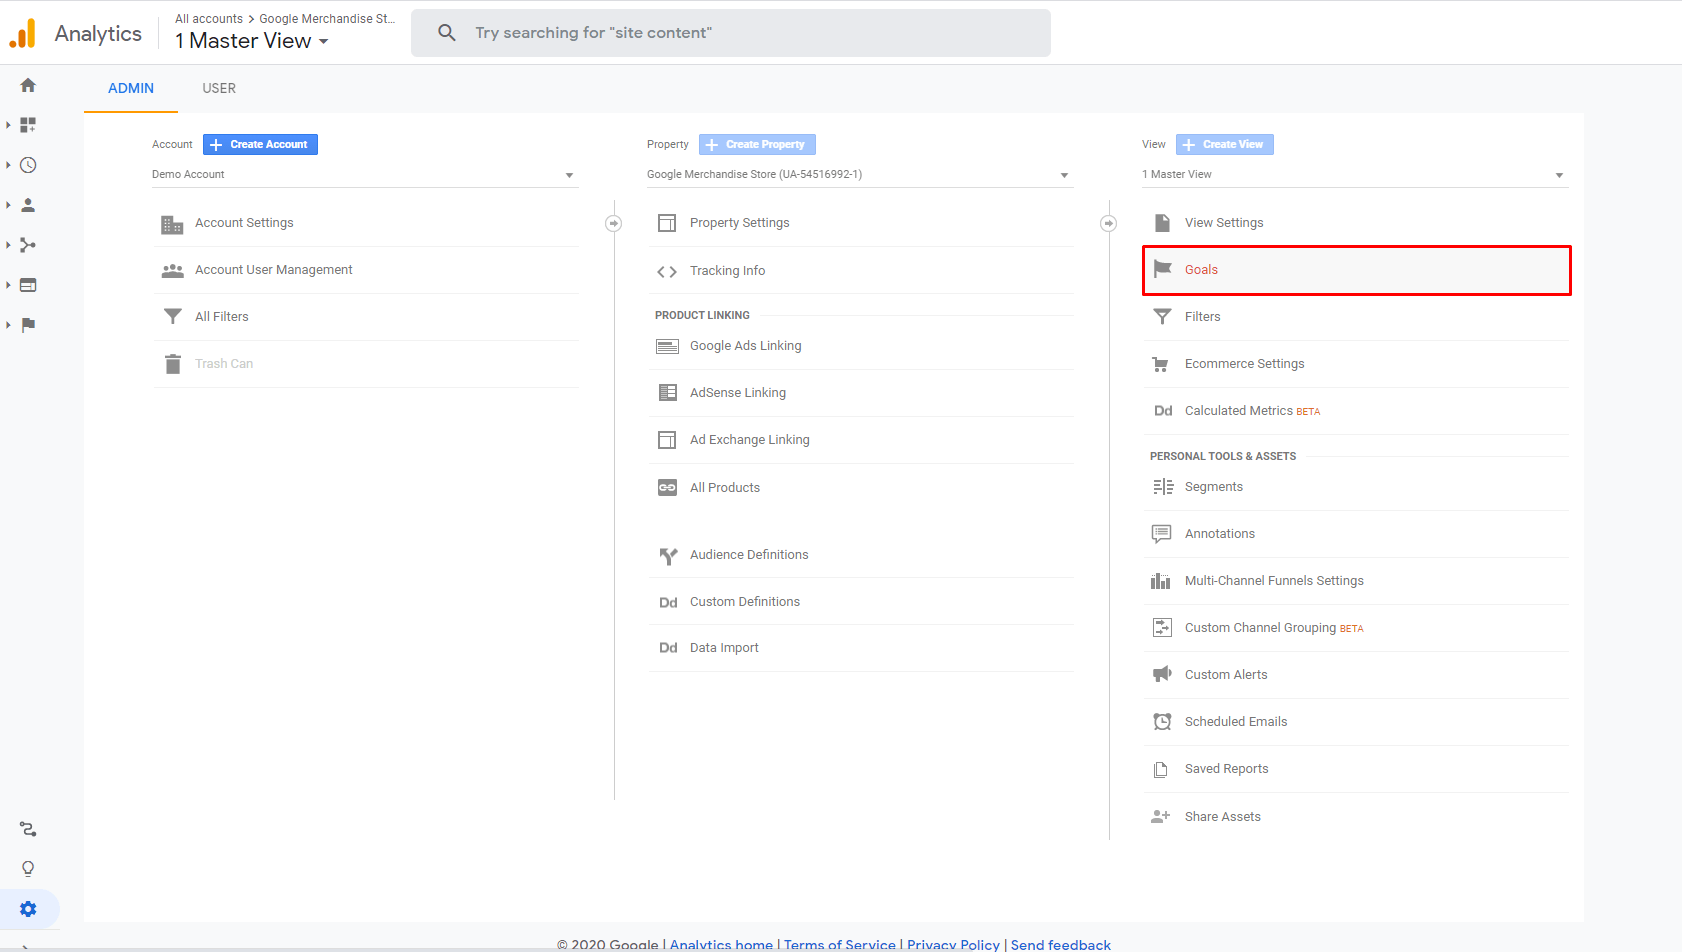
This brings us to the admin dashboard panel that shows three columns:
- Account
- Property
- And View
There’s a lot of things going on in these columns, but for our purposes today, we’re only concerned with the View column.
Step 2. Goals
In the View column, click Goals
Step 3. Add New Goal
Next, follow me down the rabbit hole, and let’s create a goal by clicking + New Goal
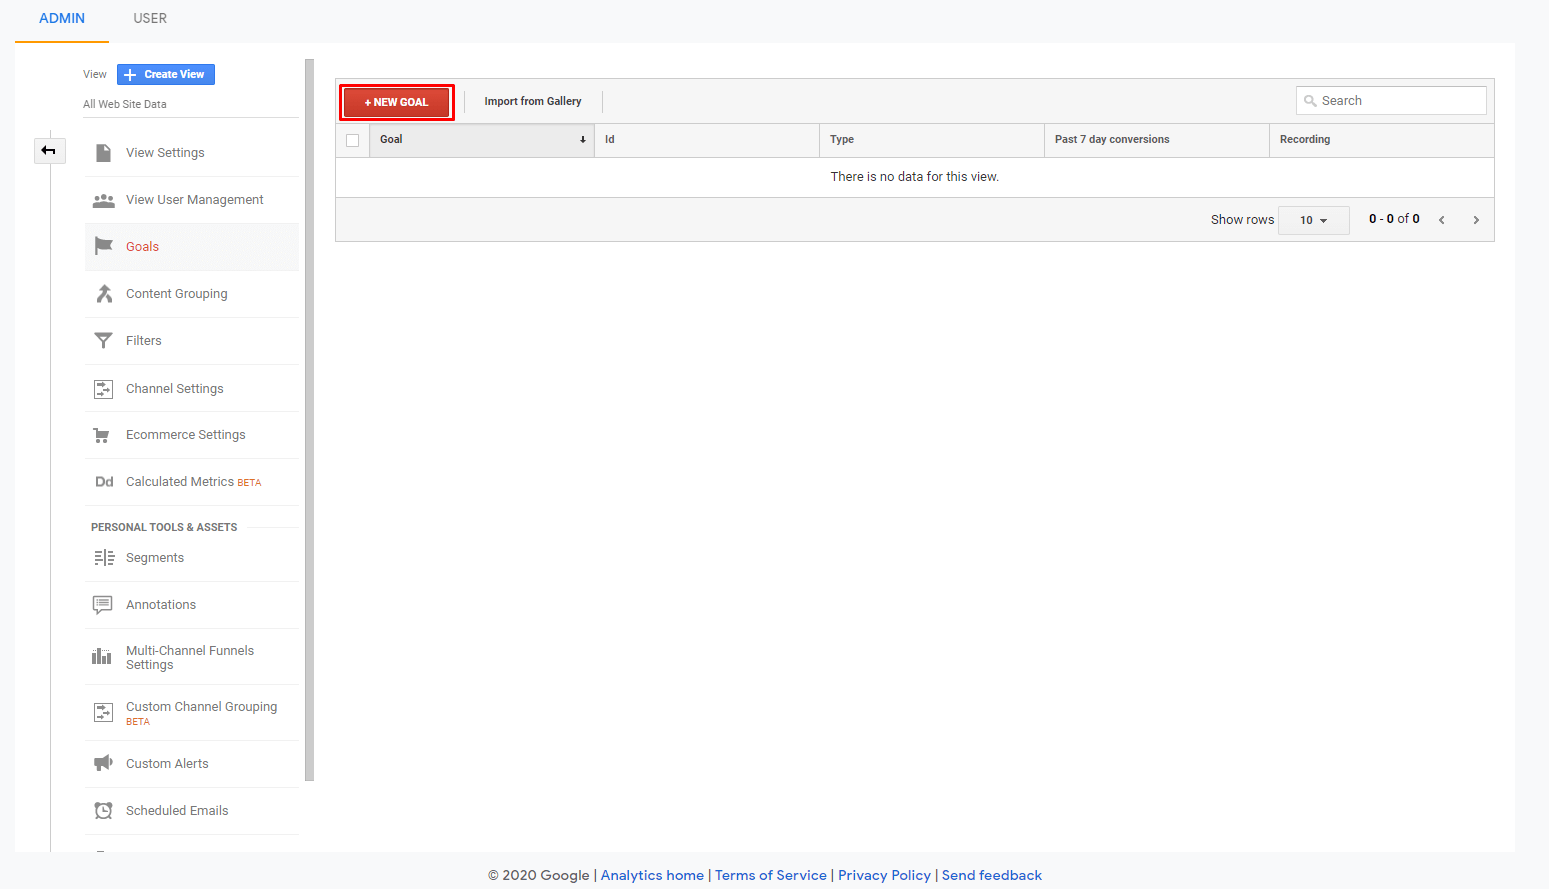
Pro Tip: If you don’t have the proper permissions, or have 20 goals configured already, you won’t be able to create any new goals. It’s the finer details like these that can really derail any progress, so it’s important to know the warning signs.
Step 4. Enter the Deets!
In this step, we’re going to enter some basic information while also covering the nitty-gritty.
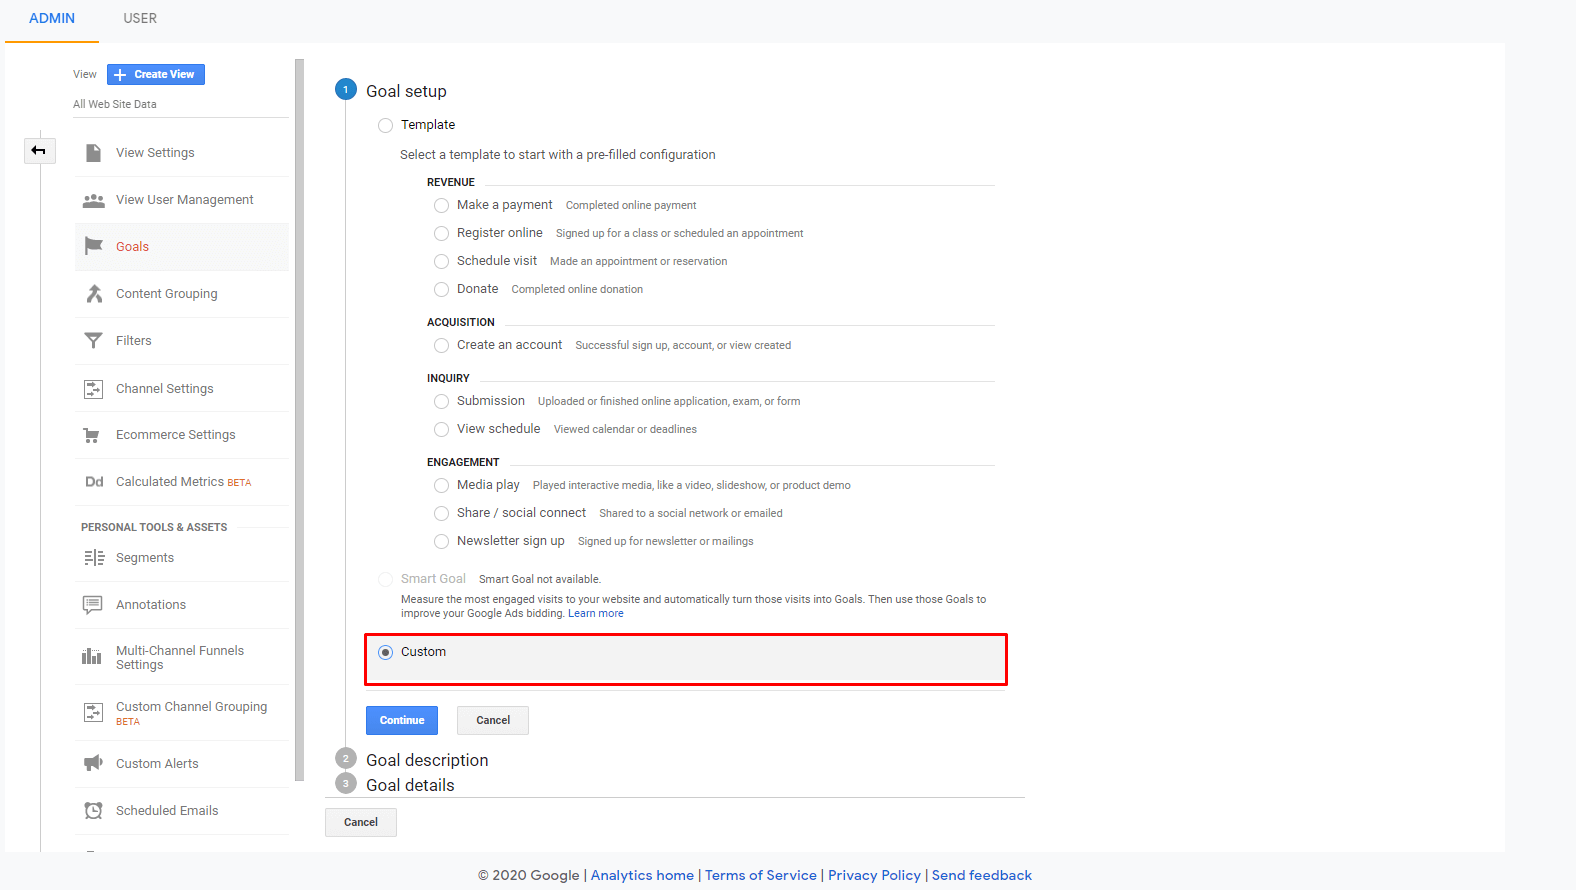
Goal Setup
The first thing you must do when configuring your goal is to choose how it’s configured. Here, you can choose a pre-built Goal template that’s pre-configured to meet standard objectives, or you can choose Custom.
So what do you choose, you may ask?
Well, it depends. Mostly it’s preference, but I find the pre-built templates to be too constrictive, so I almost always choose Custom.
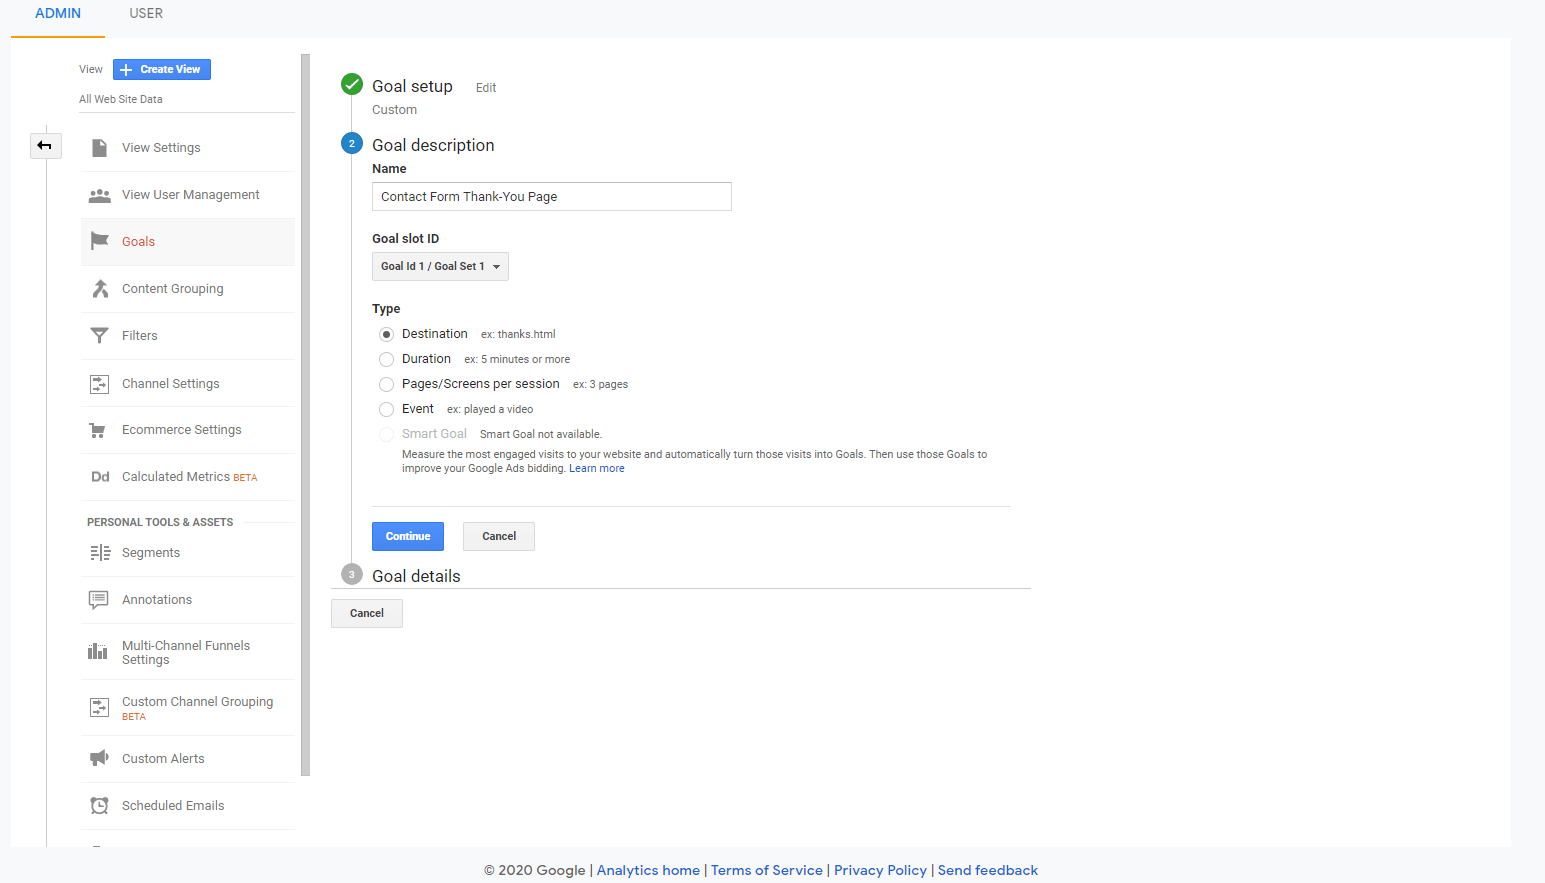
Goal Description
Here is where we get into the nitty-gritty, sans the Name field, which is pretty self-explanatory.
Name
Input a name that makes sense to you and your business objectives.
Example: “Contact Form Thank-You Page”, or “Modal Contact Form Submission – Header”
Goal Slot ID
The goal Slot ID is an oftentimes overlooked aspect of Goals that allows you to group goals for reporting purposes.
To see this in action: navigate to the home screen in analytics -> Acquisition -> all traffic -> channels -> then you can see the Goal Sets under the Explorer tab
In the Explorer tab, you can see each goal set and the conversion rate of each of the goals configured. Nice.
For our example, we’re going to keep this selected as the default (Goal ID 1 / Goal Set ).
Types of Goals
Analytics allows many different goal types, each used for a different kind of action you can measure.
- Destination
- Converts when a person views a page or screen.
- Most common Goal Type; like a thank you page.
- Duration
- Converts based on user engagement of a minimum session duration.
- Pretty self-explanatory but few use cases.
- Page/Screens per session
- Converts based on user engagement where several pages or screens per session are viewed.
- Also self-explanatory, but has some interesting use cases if you want to start weighing bounce rate heavier.
- Event
- Treat specific user interactions as a conversion.
- Example: Button Click or a Form Submission.
- Caveat: This type requires that your site is already configured to track events and pass that data to Analytics. How to do this is an in-depth discussion all on its own. Check out some of our thoughts about Conversion Tracking here.
- Smart Goal (if available)
- Smart Goals uses google machine learning to determine if the conversion should be counted.
- These types of goals automatically count conversions with the most engaged users on your website but need to meet a myriad of prerequisites, such as:
Google ads linked to your Analytics account. - At least 500 clicks from those ads.
- Caveat: Not very reliable
For our example, we’re going to select Type = Destination.
Goal Details
From here, we need to enter the Goal Details. Each Goal Type requires unique sets of specific data that can get quite complex, but for this post, I’ll be covering the Destination Goal Type.
Destination (Actual Destination)
Before we enter the screen name or page URL in the Destination field, we should take a look at the dropdown that comes before the text field.
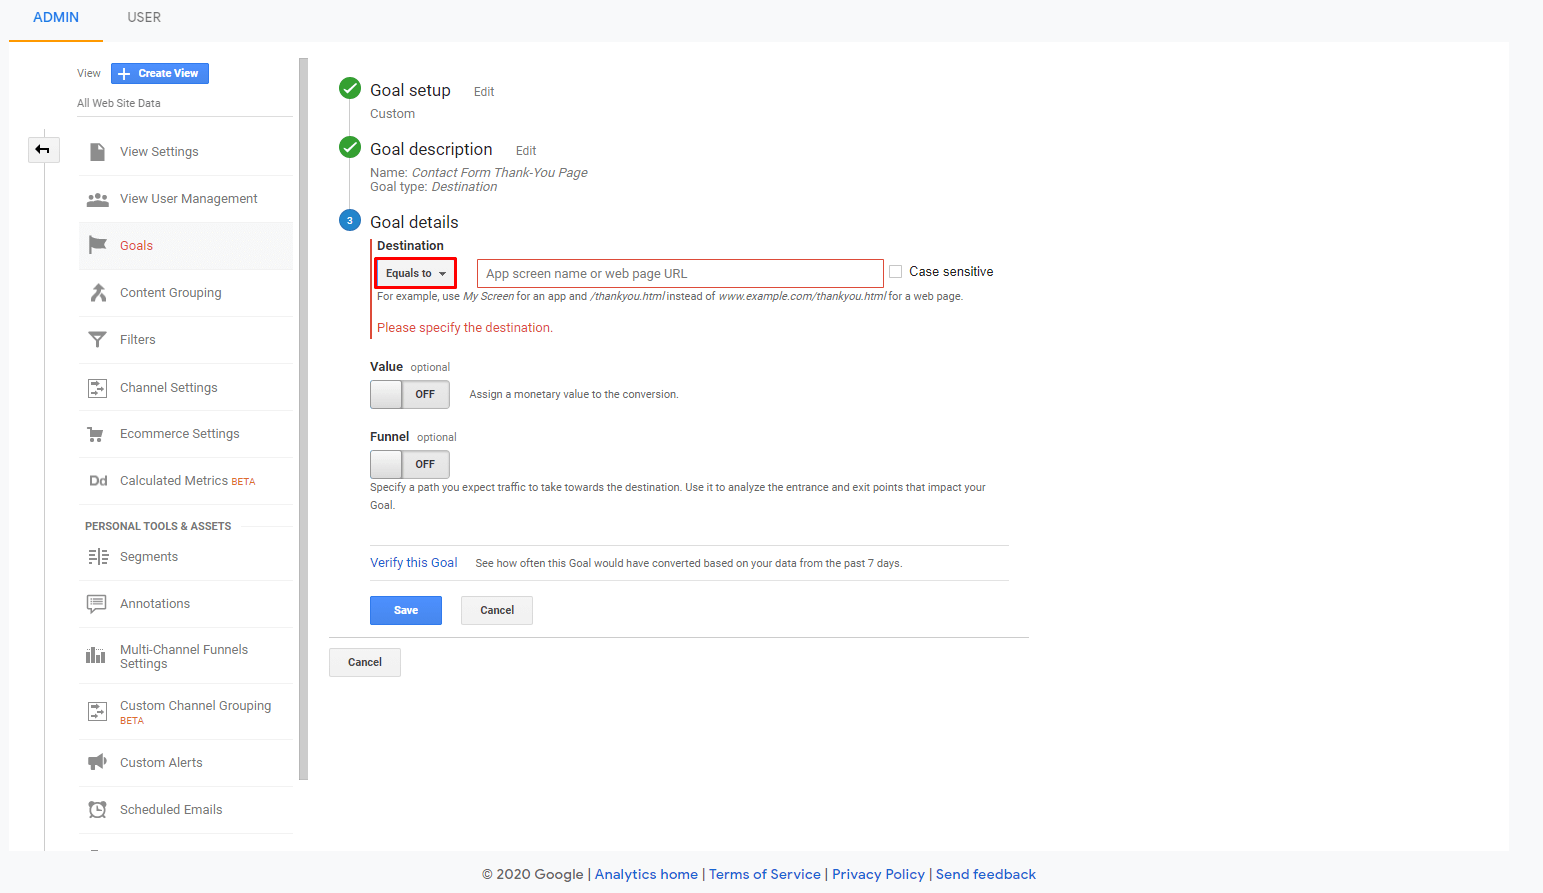
Here is where we specify the match type as Equals to, Begins with, or Regular Expression. What that means is this:
- Equals to: must be exact
- Example: /thank-you
- /thank-you = yes
- /thank-you?id563 = no
- /thank-you?id823 = no
- Example: /thank-you
- Begins with: a string that starts with the same characters
- Example: /thank-you
- /thank-you = yes
- /thank-you?id563 = yes
- /thank-you?id823 = yes
- Example: /thank-you
- Regular Expression: advanced matching option (but totally worth learning)
- Example: /(thanks|confirm)
- /thanks = yes
- /confirm = yes
- /thank-you = no
- Example: /(thanks|confirm)
Pro Tip: creative uses of Regular Expressions here can help specify URLs in cases where there are multiple thank-you pages with very similar URL structures.
For our example, we will be using “/thank-you”
Value
This is an optional field that assigns a monetary value to your goal. You can use this as a way to compare conversions or measure changes and improvements through a budgetary lens.
This isn’t always straightforward, however, since oftentimes there isn’t a real numerical value associated with each goal (or rather, conversion). So, to be flexible with this ambiguity, you can use a real, calculated, or symbolic value.
- Real Value Example: people registering for an event with a fixed price. You could enter the transaction value, so the Value would be an actual or fixed number.
- Calculated Value Example: If you had a consulting business and you had a consulting form, not every person submitting a form will convert to new business, but you could calculate the average value of each of the leads. This would be a Calculated Value.
- Symbolic Value Example: When you’re not trying to generate actual revenue or it’s difficult to track the actual value, you can use a symbolic value to guestimate or rank the importance of different conversion actions inside Analytics.
Because I want to keep things simple and not do a lot of math, for our example we’ll be setting value to = 1. I chose 1 here because a thank-you page is a significant conversion and it’s important for me to start ranking all significant conversions to show return on investment (ROI) to stake-holders. This will also give me a good starting point in case I wanted to revisit this goal with an actual calculated value.
Funnel
The funnel field is also an optional field (set of fields, really) that designates steps the user takes to reach the end destination. Configuring Funnel steps is much like how we configured the Destination field in the previous step since it uses the same match type.
This field could be beneficial if you wanted to track a certain type of user behavior, but otherwise, there are very few use cases. So for our example, we will be skipping this option.
Verify Your Goal
The last thing we could do here is to use Analytics to verify if our previous configurations would return any data by clicking the Verify this goal link.
This calculates a conversion rate based on historical data and not actual conversion data. So, it doesn’t give you insight into how well your goal will perform, which doesn’t make it very reliable for testing purposes.
Step 5: Finishing Up
So that’s it! By now, our basic example, the Goal Details will look something like this:
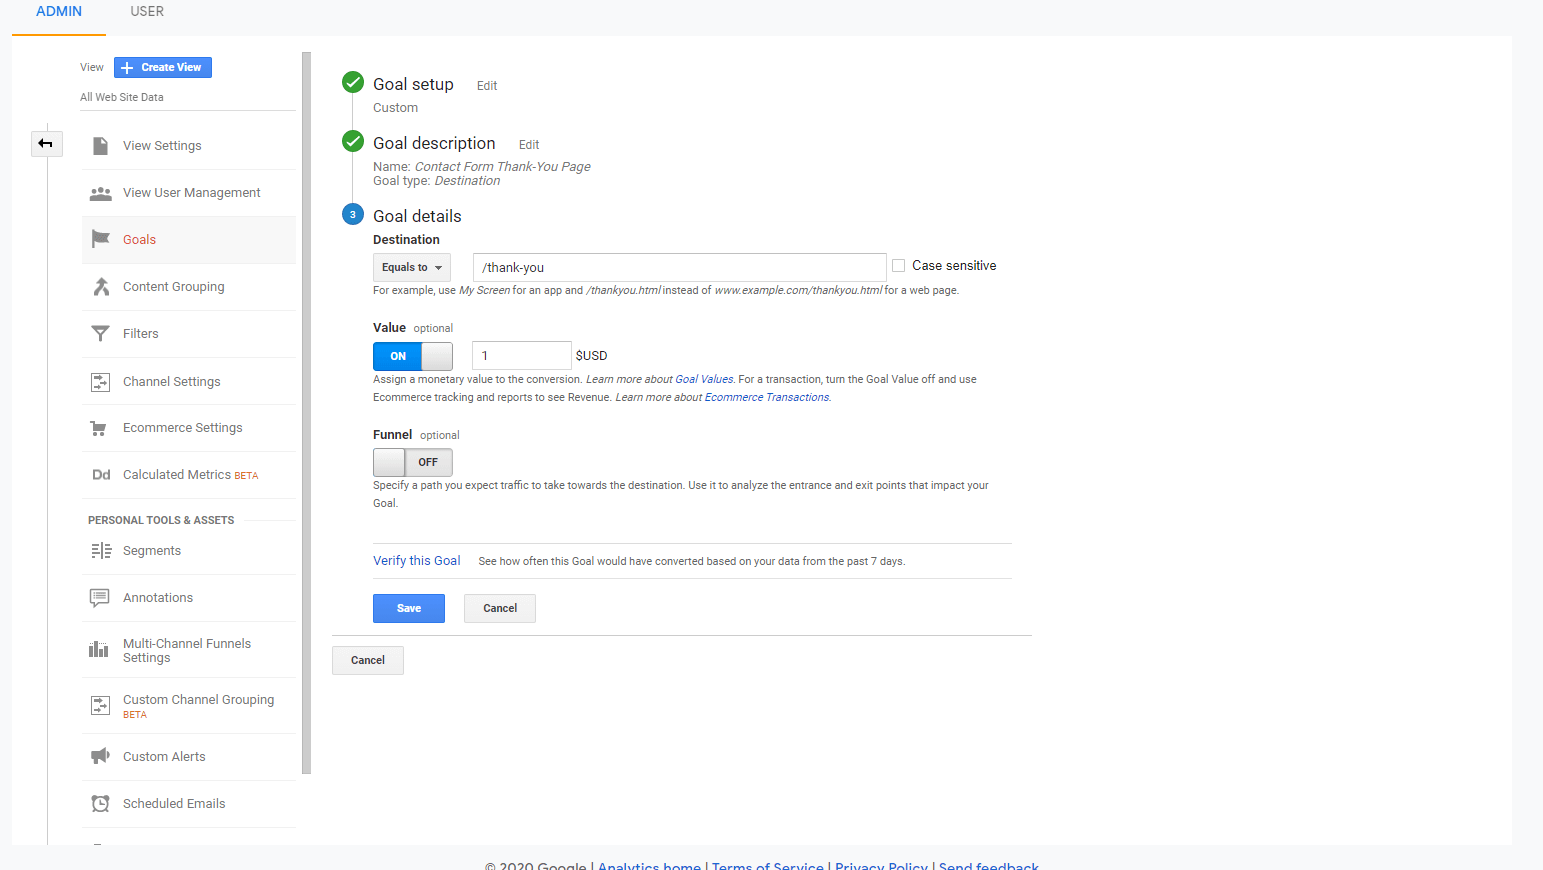
All that’s left is to click Save and create your Google Analytics Goal.
Congrats.
Cool, Now What?
Now, there’s a myriad of things we can (and probably should) do, like test the newly created goals and make sure they’re firing and set up custom reports for historical data in Analytics, but for this post’s sake: we’re going to pat ourselves on the back and call it a day…. for now.
Defining and properly configuring goals is fundamental to capturing critical information for evaluating the effectiveness of your marketing efforts. What you do with that data goes deeper down the rabbit hole of possibilities, only hampered by your imagination and business objectives.
If you’re still struggling to set up your goals or connect the dots with your data, give us a holler.